Showing posts with label faerie. Show all posts

Tuesday, May 7, 2013

Dannon's Dragon

Dannon's Dragon
No one knows better that pet ownership is a such a great responsibility as Dannon, who decided to raise a dragon as his pet. He had enough problems when the dragon burnt his slippers, ate his newspaper and flew right off his leash. But now that the dragon is looking to start a treasure hoard of its very own – starting with the Faery Queen's jewel - Dannon is starting to think about keeping a pet hamster instead.

Well balanced to stand on its own.
Dannon's Dragon is completely hand sculpted without the use of molds. The sculpture started with a glass gemstone which was fashioned into a birch base so that it would stand on its own. The little red dragon was sculpted and cured first using polymer clay, hematite and mica. After that, an armature was created out of steel and aluminum for Dannon's form. The armature was drilled into the birch base and sculpting began with his body. His armor and clothing were also hand sculpted out of clay and a touch of paint and mica powder was added to accentuate the metal of his mail. His hair and hand made wings were added. The whole process took just about a week to complete. 
 
How can he say no to this face?
I'm bringing Dannon and his ambitious little pet to the NH Renaissance Faire this weekend, along with Alula, Meeka, Willow and a bunch of gnomes! :D

Thursday, February 23, 2012

So busy I forgot to notice!

"Ilyana and the Enchanted Koi" - Hand sculpted without molds - January 2012
Things have been insane lately. I expected that after the holiday season, I'd have a dead spell and wonder what to do with myself. I certainly wasn't looking forward to it financially, but I almost think I wanted it just so I could catch up with everything I sold in the shows and festivals I attended last season. Not happening!
"Goblin Chess" - January 2012

He's cheating!
I've been really busy prowling about looking for leads for shows, festivals and shops which would like my creations. This is a hard process when you're relatively solitary like I am. Social networking is key in this game and has never been my forte. I find myself in a muddle trying to remember names and locations and dates and applications. And who do I talk to in order to find out who I talk to? I'm sure it'll come to me... what's her name again? What's my name?? Let's start over.

Faery Baby #30! She's at The Garden Party
January marked the second year The Silver Branch has been in business! This second year I'm still looking to do shows and festivals, but I'm also going to focus a lot in the spring and summer on getting my faery babies, Green Girl boxes and jewelry into shops and boutiques. Today, I started selling my faery babies at two shops that I wouldn't have thought to sell at. One is called The Garden Party. It's a floral boutique located on the oval of Milford, NH (263 Union Square). Look them up on facebook! Eileen keeps a lovely shop with lots of amazing flowers and local artisan gifts. The other shop is Here Today Emporium - an antique shop (primarily, she also sells greeting cards, bath and body stuff and .... my babies!) located on Main St in Wilton NH.

I'm also trying to expand - a hard thing to do with my tiny little working studio (I'm grateful for it, don't misunderstand that for a moment!). I've been throwing children's birthday party workshops and classes on everything from how to sculpt dragons to how to make polymer clay sushi.
Happy Birthday Madeleine! The whole party made awesome gnomes!
The Atkins Family in gnome form
My gnomes are really expanding in variety. I get so many custom orders for these cute little guys! My favorite order was to a family in Australia who wanted themselves depicted in tiny garden gnome fashion.

Other creations from the past 2 months include....

I hand blended 3 colors of viscose to make Ilyana's braided hair.
"The Faery Tree" complete with door in roots, glass leaves and good listening skills.
Sushi Ring! Leftover from teaching sushi caning.

Wednesday, November 2, 2011

When Pigs Fly

"When Pigs Fly"
I was going to post about a new 'scene' I made with gnomes and a chalkboard and glowing clay, but in light of the unlikely things happening around here lately, I've decided to unveil my latest faery sculpture to the blog instead. If someone had suggested that NH might fall prey to a blizzard that dumps 20 inches of snow and knocks out power to thousands and thousands - all before Halloween - they might reply with the title of this sculpture. I certainly would have! :)

This sculpture is seriously much more impressive in person. There's just no decent way to show the perspective of the piece with my amateur camera know-how. But, be that as it may, I've done my best. A rather adorable pig with wings is being coaxed to fly by a flying fae boy. He is in mid-air with no apparently visible support. And the miracle is he's rather quite sturdy up there! Whew!


This all came about when I found some brass rods at the little country hardware store down the street. I've been dying to work on a more difficult armature, something that would wow people. I'm pretty happy with the result. Why the theme? I was working with the television on and there was a commercial involving a dog on a roof with some flying pigs... and some canned baked beans too. Not sure where that came into it, but the flying pigs stuck in my mind. I thought, wouldn't it be nice to show just how you could get one to fly? Hence the faery and a way to try out an out-of-the-ordinary armature design.

The pig completely supports the faery. To make this design, I started with a basic (and I mean stick figure) sketch in full scale of the piece I wanted to create. Then I bent the brass rod along the center of gravity for both the pig and the faery, and then I prayed to the sculpting gods that I guessed correctly on the angle of the faery. Too far forward and he would have tipped. I got it just right! The bar runs through the piggy, up his wing, up the faery's arm and down through his torso. From there, I constructed the armature of the pig and sculpted the basic body of the pig before finally tackling the faery. This took a long while. I was so worried about the balance and center of gravity, that I put the finished pig with the brass rod sticking out on my "to do" shelf at the mill and didn't touch it for at least a few weeks. >.<
Aerial shot
When I mustered up the courage and repeated my little "nothing to it but to do it" mantra a few hundred times, I started working on the armature of the faery itself and then the clay. I was relieved that the finished piece not only didn't tip, but it was highly sturdy. You could actually push on the faery's legs (within reason, of course) and it wouldn't tip.
So I will definitely try more interesting armatures after show season has slowed down a bit.

Thursday, August 11, 2011

Adelaide and the Fireflies


Adelaide in the firefly jar.
For months, a large mason jar sat collecting dust on my "ideas to bring to life" shelf at the mill. Yes. I do have a shelf with such a name. Anyone at the mill can tell you, it's full of a rather eclectic, albeit plain, collection of items. Most seem rather boring alone - like the jar - but put them with a faery and there's a story for each item.
Adelaide
Meet Adelaide. I've always loved that name and found out it's a name of a woman swinging high up the older branches of my family tree. I'd like to imagine that woman would love this faery (more likely: my ancestors gossip about me like those griping cartoon ancestors of Disney's Mulan).
Adelaide the faery is a little miffed, if you can't tell from her expression. Picture it - you're a faery (oh go on, imagine it... no one's watching... and honestly, everyone suspects you fantasize you're a faery now and then anyway so just roll with it). The cool night air mingles with the warmth of the remains of the first day of summer. Fireflies zip around you silently. You flash your wings, lure them in and SWOOSH! You caught a few! No.. wait... that was a loud swoosh. Faeries make tiny swoosh sound effects. You look around. You see fireflies... and glass. You've been caught by a firefly catching human!
Adelaide's Wings. ^_^ It's hard to tell but there are 4 of them. She had to have small dragonfly wings so that she would fit into the jar.


The green "fireflies" are actually LED lights. There's a battery pack on top of the lid so they'll never wear out. Adelaide herself is hand sculpted. You know me - I never use molds. Unlike my miniatures in bottles, Adelaide was sculpted outside the jar. I made an aluminum foil circle the size of the jar opening, and when I sculpted her, I did so on top of that circle so I knew she'd fit. She's mounted on a clay base that I covered with cloth, silk leaves and the occasional late spring silk flower.

Thursday, May 19, 2011

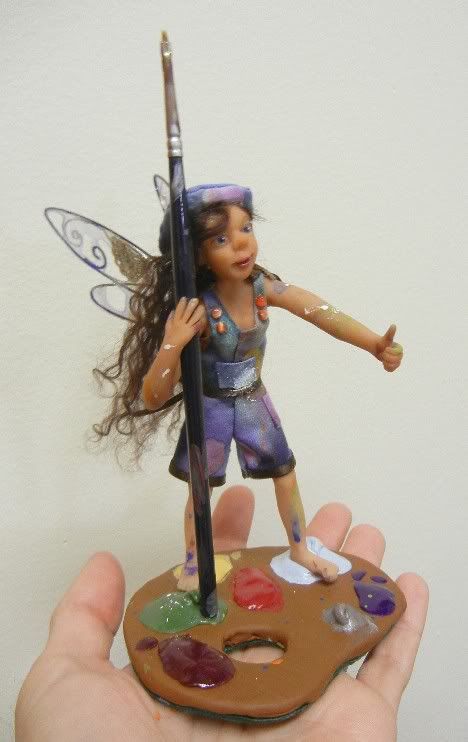
She needs a name - New Painter Faery!

I just finished her today!
click to enlarge
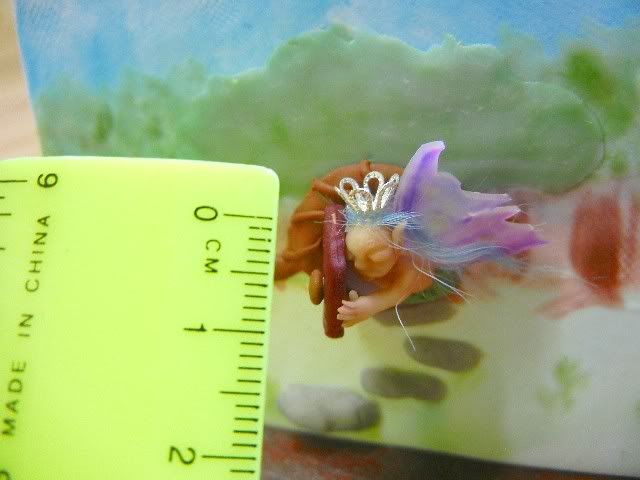
So new that she doesn't even have a name yet (nor does her little creation). I had been working on this cute little fae all week, and had created her painting last week. I was inspired by a little wooden easel I found at the dollar store made for collective plates. It's perfectly faery sized! Plates? Pshh. No thanks. The canvas and the painting are all made of clay. I started by cutting a rectangle out of white clay, then painted on the wet clay with a mixture of liquid polymer and ink. In the center of the painting is a door with stones leading up to it. And as it was the faery's creation, a little magic was in the paints. A tiny (seriously TINY) faery is coming out through the door!
I sculpted her with a needle.


The painter faery (wow... really need to get a name for her!) was really fun because I tried a couple of "new techniques" on her. For one, I had a blast blowing paint through a glass pipe at her to give her a true artist appearance. The splashes and smears are hard to see in the pictures, but she has lots of purple, blue, green, white and silver flecks.


When you stand in paint, you get a little dirty
Another thing I tried was simply dragonfly style wings. Instead of curling long "spokes" for butterfly ribbing, I made long oval loops with blue metallic coated copper and silver spirals inside. Lastly, I had sewed a little beret and created a little matching pair of overalls for her. Because she's not a jointed doll, she was extremely hard to dress (at least for me. I'm really not a seamstress in the slightest!). Making a pair of pants is easy enough, but you can't just slide them on because the legs are rigid. Same with sleeves.

Friday, May 13, 2011

New OOAK faerie! - "Oliver's Snail Mail"


"Oliver's Snail Mail"

Faeries can deliver mail at the speed of magical wings - be sure to specify "air mail" for that service. For all else, there's snail mail. This is Oliver's first job. He's already gotten rather used to the pace.


This art doll sculpture started with a large shell. I'm sure it's some sort of seashell, but it just screamed "garden snail!" to me. I thought about turning the shell into a garden gnome house with a little chimney and a lawn, but I wasn't in love with the idea. It sat on my shelf at the studio collecting dust for at least 2 months before I decided to create the snail that went with it just to see what it would be like with some clay breathing life into it. Once I formed that bizzare little critter, I was on a roll. I saw a mail bag, letters all over the place and a faery fast asleep on the mail bag as he delivered urgent letters. Hence, Oliver was born. ^_^

Oliver will probably go in my Etsy shop later in the week, but for now, you can also view him up close at Riverview Artist Mill if you're in the NH area.

(by the way - Charly, if you read this, I posted my letter to you this way. You should recieve it... soon? heh)

***NOTE: I'm doing a raffle for a wicked sweet handmade faery wing pendant for anyone who comments on my blog this week. See the bottom of my previous post for more details on the contest!****

Tuesday, April 19, 2011

"Shaelin's New Nest" - OOAK Faery

 Warning: photos really don't do this sculpture justice. Honestly, her face, clothing and the bird look much better in person. That being said...

Yay! I was actually able to complete a concept I had locked in my otherwise scatterbrained head for over a month now. I started with the concept of a faery trying to hoist a bird out of the nest, much to the bird's annoyance. That was followed a few weeks later by a trip to the art store to buy the nest. I mean, have you actually sat down and tried to make a bird's nest for yourself? No really. Have you? Not. Fun. Aside the nest, the rest of this art doll sculpture is completely hand made. As usual - no molds.


I started with the bird's armature and then completed the bird before moving onto Shaelin's armature. In my original thought, I had pictured a much smaller faery, but realized her arm span would have to be grotesquely ... lengthy. lol So there you have it. Shaelin was created to be about 7 inches tall if she were standing upright. Her face is about the size of an American nickel.

Penny is actually touching her hair - it's not in the foreground.

I think she's related to Tara from "Tara and the Toad", as she's rather impish and loves causing mischief for small critters.

Her wings are hand made just like all my other faeries. This time, I added brass filigree (hard to see in the photos, sorry) and brown jewels. I decided to go wild with some swirls at the "ribbing" and I think they turned out awesome.
Gotta love faery wings!

On another note, if you're in the Southern NH area, google map 29 Howard Street in Wilton NH and make a large red permanent marker note on your calender to be there between 10am to 4pm on Mother's Day weekend!! It's the Riverview Artists' Mill's open studios. Lampworking, bead supplies, pottery, silver and gold smithing, water color painters, energy workers, soap makers, dresses.... oh... and my sculptures! Will all be there. ^_^

Lastly, I'd like to thank Lori Ferguson  for featuring me in her awesome art blog, Madd Dogg of Tomorrow. Be sure to check out, comment and subscribe! Later in the week, I'll be featuring her work here on my blog (been meaning to do that with a lot of my favorite artists, jewelers, and otherwise totally cool people).

Sunday, March 6, 2011

How I started making Faeries

"Ash" - What a learning experience he was!

My focus at present seems to be on practicing polymer clay faeries. Yeah, I do spell 'fairy' in that geeky 'epic, fantasy' like way. Truth be told, this was the old english spelling and dates from texts at least as far back as the 16th century, so it's not as new age as many make it out to be.

Now where'd I get this desire? I do love my 'green girl' faces and faery doors and haven't abandoned them, I promise. But I've always had 'a thing' for faeries. It was about 2 years ago that I took a little ball of clay and tried to follow an online tutorial on how to shape it into a baby's face. I still have that rather scary baby. As you can see from the picture of it below, I was inspired from that point on to give polymer clay a long vacation: no pay and no guarantee that there will be work for it again once it returns.
About 6 months ago (maybe less) I picked up a pack of Sculpy again... mostly out of boredom I think. I was battling the worst kind of writers block. It was the kind where you have an amazing plot, and even characters to boot, but no idea where to start the whole darn thing! I needed some sort of release. I made a dragon. Note about Sculpy III - it breaks at the very thought of tapping it. Brittle, powdery bits of a young dragon all over my car! Well, I moved onto Super Sculpy. I made faces with leaves around them and painted them to look like antiqued copper and sunlight speckled forest canopies. My 'Green Girls' (so called because they look like the Green Man, but I always saw them as too feminine) I flatter myself that I grew better at making faces. Still, I remembered my little baby faery and put full figures on the back burner. I made faery doors, started a flower nymph collection (working on flower #3! Wooo!), gnomes, jewelry. Finally, I decided to try it out. I took some wire and created an armature.

Watch out for my upcoming blog post all about my first somewhat decent OOAK (one of a kind) polymer faery - Ash.