Showing posts with label melanie chouinard. Show all posts

Friday, October 11, 2013

Wendlyn at the Pumpkin Festival

"Wendlyn's Doorway"
This evening starts the 2013 Milford Great Pumpkin Festival. For lucky people like me, (aka, those setting up their booths in the town hall auditorium) we don our festival game-on faces tomorrow morning at 10 am and can't relax again until 8pm. I'm also there from 10-3 on Sunday. (Monday? I'm crawling under my giant fern on the balcony and falling asleep in a fetal position until Tuesday.) I never got to make my steampunk faery in time for this event - I just wasn't inspired enough by a storyline. BUT! I did create this cute little girl. For your viewing pleasure: "Wendlyn's Doorway."
Wendlyn is a bit of a ragamuffin, bohemian sort of gal. She started with an antique key, a couple of pieces of wood and some fabulous ribbon I found at Michaels of skeleton keys. Not being a huge wood-worker, my father went to work cutting and connecting the two boards to create a stand and backing for Wendlyn's portal to the realm of Faery. I created the door out of copper, silver and green clay, cut the keyhole by hand and -magic!- you can peek inside the keyhole to see the lush magical forest beyond. Want to see more? Well, Wendlyn is the keeper of the key to unlock it. Maybe if you ask her really nice...
Her skirt is half clay, half real ribbon and lace.
Wendlyn is also a special addition to The Silver Branch OOAK faery line because she is a teaching piece. I took pictures of her throughout the creation process (when I could remember to! Sometimes momentum is everything in sculpting). And I will soon be taking down the ridiculously stuffed fan art board in the hallway to post pictures and explanations of her creation. This way, I hope more visitors to Riverview Mill and my studio will understand how special these little faeries are because of all the work that goes into them! Here is one of the creation images.

Working to position her head. Forgetting to give them ears is one of my worst habits. Ears are so fragile when the clay is wet that it's best to leave them off as long as possible. I've sometimes had to rush sculptures out of the hot oven before they've cured after realizing they're missing their ears! I didn't forget this time. Once her head was positioned, she got two cute little pointed ears.


Tuesday, May 7, 2013

Dannon's Dragon

Dannon's Dragon
No one knows better that pet ownership is a such a great responsibility as Dannon, who decided to raise a dragon as his pet. He had enough problems when the dragon burnt his slippers, ate his newspaper and flew right off his leash. But now that the dragon is looking to start a treasure hoard of its very own – starting with the Faery Queen's jewel - Dannon is starting to think about keeping a pet hamster instead.

Well balanced to stand on its own.
Dannon's Dragon is completely hand sculpted without the use of molds. The sculpture started with a glass gemstone which was fashioned into a birch base so that it would stand on its own. The little red dragon was sculpted and cured first using polymer clay, hematite and mica. After that, an armature was created out of steel and aluminum for Dannon's form. The armature was drilled into the birch base and sculpting began with his body. His armor and clothing were also hand sculpted out of clay and a touch of paint and mica powder was added to accentuate the metal of his mail. His hair and hand made wings were added. The whole process took just about a week to complete. 
 
How can he say no to this face?
I'm bringing Dannon and his ambitious little pet to the NH Renaissance Faire this weekend, along with Alula, Meeka, Willow and a bunch of gnomes! :D

Wednesday, October 19, 2011

New Faery - Jasmine's Green Tea

Everyone knows that tea - especially green tea - is good for you. Full of antioxidants, rich in that lovely anxiety combating L-theanine, slimming, and quite yummy if you brew it correctly. However, have you bathed in it? No - nor have I. Jasmine certainly has. She swears by it! Look at her flawless comlexion. Perhaps there is something to it after all?
This is Jasmine - a bit of a narcissist?

Okay, all that aside, it's kind of been a personal goal of mine to make a new faery or mermaid for each venue I go to. My next show is at The Cozy Tea Cart in Brookline, NH, on November 5th and 6th. This is an event for NH Made's "Open Doors" event in which NH artisans of all kinds hold open studios, shows and tours.
the "green tea" is a special clear resin with hand mixed coloring

The Cozy Tea Cart is a lovely little shop connected to the home of it's proprietor (Danielle Beaudette). It's jam-packed with every sort of loose leaf tea imaginable and a few special herbal tisanes. It's enough to make your head spin, but Danielle is such a friendly, wonderfully patient and knowledgeable person that you'll soon fall in love with at least a dozen special teas in no time.


"Green Girl Box" Hand Sculpted face
I was lucky enough to be invited to this lovely place for the Open Doors event because of the faeries really. TCTC has a lovely little faery garden and Danielle likes to promote local artists when possible. What a perfect match! ^_^ So back to Jasmine! She is, as usual, hand sculpted without the use of any molds. Her tea cup and saucer are not, however - I got those from my own cupboard. The spoon she holds to admire her visage is an antique spoon I bought from Here Today Emporium in downtown Wilton, NH. Her hair is hand 'rooted' and her wings are hand made.

The tea, if you've read the caption above, you'll know the secret behind that. It was a special resin indeed. Some resins will just eat food coloring, so I was lucky this worked out. The bubbles are made of glass. For a finishing touch, I sewed little faery sized clothes and slung them around the saucer (with a stocking slung over the cup handle). Her shoes and belt are made of polymer clay.
Glass bubbles really give her tea a bath time look.

Thursday, August 11, 2011

Adelaide and the Fireflies


Adelaide in the firefly jar.
For months, a large mason jar sat collecting dust on my "ideas to bring to life" shelf at the mill. Yes. I do have a shelf with such a name. Anyone at the mill can tell you, it's full of a rather eclectic, albeit plain, collection of items. Most seem rather boring alone - like the jar - but put them with a faery and there's a story for each item.
Adelaide
Meet Adelaide. I've always loved that name and found out it's a name of a woman swinging high up the older branches of my family tree. I'd like to imagine that woman would love this faery (more likely: my ancestors gossip about me like those griping cartoon ancestors of Disney's Mulan).
Adelaide the faery is a little miffed, if you can't tell from her expression. Picture it - you're a faery (oh go on, imagine it... no one's watching... and honestly, everyone suspects you fantasize you're a faery now and then anyway so just roll with it). The cool night air mingles with the warmth of the remains of the first day of summer. Fireflies zip around you silently. You flash your wings, lure them in and SWOOSH! You caught a few! No.. wait... that was a loud swoosh. Faeries make tiny swoosh sound effects. You look around. You see fireflies... and glass. You've been caught by a firefly catching human!
Adelaide's Wings. ^_^ It's hard to tell but there are 4 of them. She had to have small dragonfly wings so that she would fit into the jar.


The green "fireflies" are actually LED lights. There's a battery pack on top of the lid so they'll never wear out. Adelaide herself is hand sculpted. You know me - I never use molds. Unlike my miniatures in bottles, Adelaide was sculpted outside the jar. I made an aluminum foil circle the size of the jar opening, and when I sculpted her, I did so on top of that circle so I knew she'd fit. She's mounted on a clay base that I covered with cloth, silk leaves and the occasional late spring silk flower.

Wednesday, August 3, 2011

Starfish Lullaby

For the first time, I've made a sculpture without an actual story in mind. I picked up this smooth granite stone off rocky Rye Beach in New Hampshire. I saw a starfish. I saw a mermaid. I brought the rock home to let the story create itself. Well! It worked somewhat; the sculpture came out easily enough from my imagination... but the story still remains at large.

This adorable mermaid is indeed tuckered out. She sleeps snugly under the cozy arm of a starfish. However, why is she doing this? Something tells me there's a friendship story in this little sculpture. Perhaps this is a good contest question.
I'm looking forward to another trip out to the rocky Atlantic coast so I can take pictures of the pair in their 'natural environment'. Nothing beats a natural setting. As I only completed this sculpture today, I had to make due with white paper and a light box.
Her glass bead belt and her sparkling tail are best viewed in person. You should all come to Wilton, NH to see her. :)
The starfish came first. I blended 3 colors and 2 brands of polymer clay to get the right color, shine and strength that I wanted. I used an eye dropper tip to impress all of those little bumps which are common on starfish of the NH coast.

The mermaid was just plain fun. Unlike the 'Captive Mermaid' and 'Shell Maiden' sculptures I created before her, she has wing like fins shooting from her back. Her copious blue hair shimmers with silver specks of light and it unfortunately hides her awesome shoulder fins. But, the beauty of art dolls is that you can move her hair and style her hair to reveal her lovely shoulders. :)
Is it just me or does the Captive Mermaid look... happier? o.O

Tuesday, August 2, 2011

The scary doll and other tales.

The scary doll's wabbit.
I realized with horror that my last post was in May. MAY! Where'd June and July go?? Oh, well let me tell you a few things I've learned. One: you want to have a booth or table in a show? You better realize you do at least 6 months in advance or all the spots are taken. I've been really lucky and managed to find the applications to shows and festivals a week or two before they are due. Two: some people actually do take your business card AND contact you in a few days. I always thought that was just a line people say to be polite. Three: Heat waves and polymer clay are not good bedfellows. We had a week where the clay felt like melting chocolate. I couldn't sculpt with it and it kept me craving dark Lindt truffles.

Well insert montage music here and allow me to recap the highlights of the past 2 months. :D If you care to go beyond the pictoral feast, I've included captions! Yay!

HAPPY BIRTHDAY JANNA! (she turned old on July 29th) Ok - about the doll. No. She's not a faery. No. I cannot pay for anyone's therapy bills for viewing her. But yes, Janna has these sort of tastes at times. Janna is my best friend and needed a doll to act out all her Tim Burton-esque fantasies with. The wabbit at the top of the screen is the polymer clay "rag" doll in this doll's arm. This doll was sculpted with a mix of polymer clays, air dry ceramic, paint, fabric, vintage lace, llama wool and the theme to Coraline as well as the Dresden Dolls stuck in my head. 
This gnome is my tiniest yet. Seriously. The bottle is only about an inch long inside. I've been having fun making very tiny miniature scenes. Gnomes are my favorite. This one comes complete with house and flopsy ferns. ^_^ Photograph courtesy of Andrea Pirkey.

This lovely vessel was handmade by Jason Powers of Powers Art Glass. With a tiny needle, I sculpted the grass, mushrooms and little faery to fit inside. We made a couple of these fantasy vessels; another contains a gnome! As far as I know, this little cutie is still for sale.
My newest faery baby. :) I can't believe I'm up to 23 of these little cuties! 

This fire phoenix was one of my favorites. I hand carved each feather and placed them individually. This was one of those instances where I found an item and instantly saw a sculpture in mind for it. This was a large, gorgeous daisy from a fabric store.
This baby sold a while ago - I just always loved this picture. ^_^
My "Naturally Shed Faery Wing Necklaces" have been fun to make this summer. They catch the sunlight so well and I was thrilled to actually see someone I don't know at the post office the other day wearing one! The metal is silver plate, but I also made some in sterling silver for a gallery in Chicago, IL. I'm thrilled to be there! :D

Thursday, May 19, 2011

She needs a name - New Painter Faery!

I just finished her today!
click to enlarge
So new that she doesn't even have a name yet (nor does her little creation). I had been working on this cute little fae all week, and had created her painting last week. I was inspired by a little wooden easel I found at the dollar store made for collective plates. It's perfectly faery sized! Plates? Pshh. No thanks. The canvas and the painting are all made of clay. I started by cutting a rectangle out of white clay, then painted on the wet clay with a mixture of liquid polymer and ink. In the center of the painting is a door with stones leading up to it. And as it was the faery's creation, a little magic was in the paints. A tiny (seriously TINY) faery is coming out through the door!
I sculpted her with a needle.


The painter faery (wow... really need to get a name for her!) was really fun because I tried a couple of "new techniques" on her. For one, I had a blast blowing paint through a glass pipe at her to give her a true artist appearance. The splashes and smears are hard to see in the pictures, but she has lots of purple, blue, green, white and silver flecks.


When you stand in paint, you get a little dirty
Another thing I tried was simply dragonfly style wings. Instead of curling long "spokes" for butterfly ribbing, I made long oval loops with blue metallic coated copper and silver spirals inside. Lastly, I had sewed a little beret and created a little matching pair of overalls for her. Because she's not a jointed doll, she was extremely hard to dress (at least for me. I'm really not a seamstress in the slightest!). Making a pair of pants is easy enough, but you can't just slide them on because the legs are rigid. Same with sleeves.

Friday, May 13, 2011

New OOAK faerie! - "Oliver's Snail Mail"


"Oliver's Snail Mail"

Faeries can deliver mail at the speed of magical wings - be sure to specify "air mail" for that service. For all else, there's snail mail. This is Oliver's first job. He's already gotten rather used to the pace.


This art doll sculpture started with a large shell. I'm sure it's some sort of seashell, but it just screamed "garden snail!" to me. I thought about turning the shell into a garden gnome house with a little chimney and a lawn, but I wasn't in love with the idea. It sat on my shelf at the studio collecting dust for at least 2 months before I decided to create the snail that went with it just to see what it would be like with some clay breathing life into it. Once I formed that bizzare little critter, I was on a roll. I saw a mail bag, letters all over the place and a faery fast asleep on the mail bag as he delivered urgent letters. Hence, Oliver was born. ^_^

Oliver will probably go in my Etsy shop later in the week, but for now, you can also view him up close at Riverview Artist Mill if you're in the NH area.

(by the way - Charly, if you read this, I posted my letter to you this way. You should recieve it... soon? heh)

***NOTE: I'm doing a raffle for a wicked sweet handmade faery wing pendant for anyone who comments on my blog this week. See the bottom of my previous post for more details on the contest!****

Saturday, April 2, 2011

Green Girl Boxes - without the boxes? Oh dear....

The first polymer creations I started my business with were whimsical takes on the Green Man - my "Green Girls". So called because for a while in the beginning, all my faces looked rather feminine no matter what I tried. These are humanesque faces that I sculpt completely by hand - molds are for wimps! (just kidding, I love all clay artists. Even moldy ones.) Then I cut out and vein tedious little maple, birch and (sometimes) oak and ivy leaves by hand with a little knife and arrange them as I see fit around the face. After the sculpture cures, I paint them to give the illusion of tarnishing copper.

These sculptures are great in shadow boxes to adorn a wall, but more popular are my jewelry type boxes. I started purchasing lovely, affordable wooden boxes with magnetic clasps from a craft supply store back in October. They are the perfect size and great quality for my needs. I stain the boxes, create free hand celtic knotwork on 2 sides and the front with green and gold paint, glaze the box, felt it, and then crown it with an original green girl.

My problem now, is that after all these months, with 2 shops keeping them in stock and at least 2 other shop keepers interested in carrying them, I can't get those perfect blank wooden boxes any more! I used to use larger boxes with base metal clasps before I went to these little magnetic ones. I'd rather not go back to those boxes because I feel the clasp just doesn't match as well as it should. Scallop shell base metal with celtic knots? Eh. But now I'm at a loss of what to do aside take up wood working. Anyone know where I can get a cheap lathe and a few acres of birch?

If there's anything I've learned from this, it's to not rely on a single supplier for what will be a staple item. Now I'll have to find replacement boxes and I'm a little nervous that those who wanted these exact types won't be that happy with them/me.
This was my first box sold online. It's small and hexagon in shape - it was very hard to work with when it came to painting the little knot and felting it inside. I hope I don't have to return to these!

Tuesday, March 29, 2011

Back Claying Again - The Littlest Mermaid

I suffered a severe case of clay withdrawal these past two weeks. For those who didn't know it, I've been recovering from an eye injury and consequent surgery. As such, I've been one-eyed and not up to creating my little creatures. :( Today, I was well enough to return to the artist mill and actually get some work going!
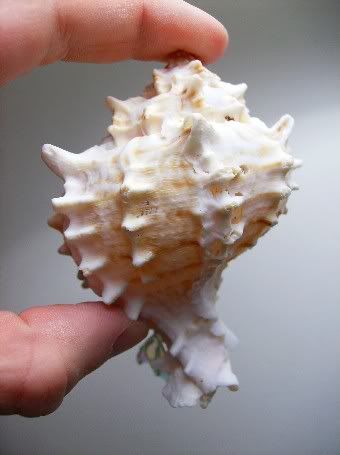
Just a shell? No, this is not clay. But it's not just a shell either...
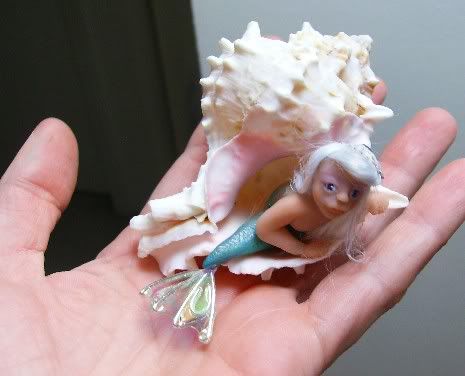
 My eyesight becomes rather blurry and dizzy when I try to focus on tiny details, but that didn't deter me from trying to create something with some seashells I found. Here was the result of my claying today (playing + clay = claying). The seashell is only 3.5 inches long (8.89 cm). It's an original idea as far as I know. I've seen shells with faces sticking out of them from other artists, but never an entire tiny mermaid.
Flip it around and you've found her - my littlest mermaid yet. ^_^

I created this little shell mermaid out of polymer clay. It's hard to tell from the photos, but she is reclining doubled up - her bottom tucked back into the shell. No molds, like usual. Her hair is that horrible viscose stuff that I hate It gets EVERYWHERE! And it doesn't like to stay soft and realistic if you use mousse or water to style it. It was all I had to work with today though and I was impatient to finish her. Her tail is painted with a blend of oil paints and acrylics. Her tail fin is silver plated copper and a mint green film.
Just to give you a better idea of her size. I was discouraged when my eyesight completely lost all focus when painting her eyes! I really hope my eye heals soon! D: